The Ultimate Guide to Setting Up Your Hansdhwani Turntable with Expert Tips
- Jun 4
- 4 min read

Thank you for choosing the Hansdhwani Turntable, a premium masterpiece from EBI Audio. Every component of this handmade turntable has been crafted with absolute precision, artistic beauty, and uncompromising audio fidelity. Designed by visionary Indian Engineer Tariq Shafeeque, the Hansdhwani represents the pinnacle of high-fidelity analog playback engineering.
This comprehensive manual will guide you step-by-step from unboxing to your first audiophile listening session. Please follow these instructions carefully to ensure perfect operational accuracy and distortion-free musical immersion.
What Comes in the Box: Your Hansdhwani Turntable Components Checklist
Before you begin assembly, verify that you have all the parts. The Hansdhwani turntable includes:
Turntable Base
Plinth
4 Spikes Discks
Platter
Speed Measurement Sheet
Carbon Platter Mat
Spindle Knob
Main Brain Motor
Second Motor
Power Supply Box
Power Cable
Aviation Cable
2 Rubber Belts
Tonearm Materials
Having all these components ready will make the setup process smoother and prevent interruptions.
Note regarding Tonearm: If your purchase includes an EBI Audio tonearm system, the specific components, counterweights, and tonearm calibration steps can be found in our dedicated Tonearm Setup Guide / Blog.
Preparing Your Workspace
Start by choosing a flat, stable surface for your turntable. Uneven surfaces can cause vibrations and affect playback quality. Use a spirit level or any flatness measuring tool to confirm the surface is perfectly horizontal.
Positioning the Spikes Discks and Plinth

Arrange the 4 Isolation Spikes Discks on your verified flat surface, aligning them roughly with the footprint of the turntable.
Carefully unbox the heavy Turntable Base Plate and rest it onto the surface.
Ensure that each of the four adjustable isolation feet sits perfectly centered within its respective Spikes Discks.
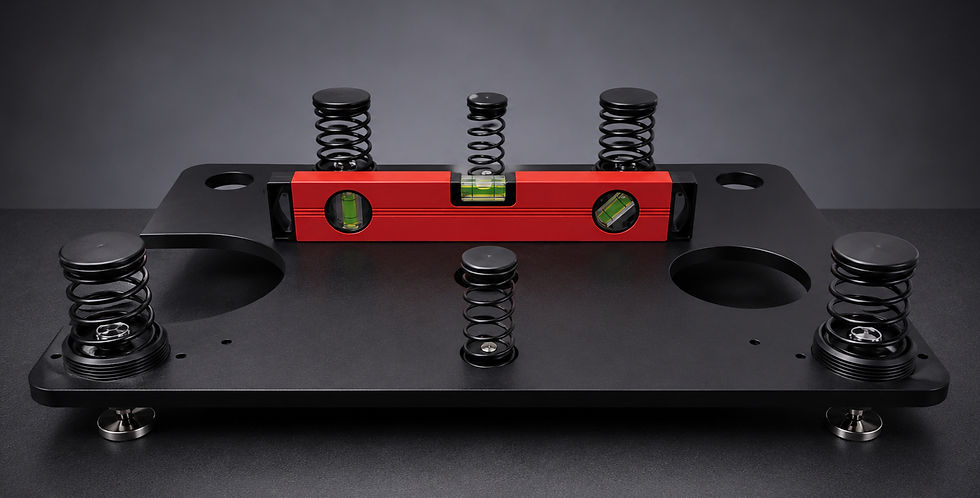
Leveling the Base Plate
Once all base plate feet have been precisely seated on the spike discs, the assembly should be leveled to achieve a balanced and stable surface.

Place your precision spirit level tool directly onto the top surface of the Base Plate.
Adjust the height

Place your precision spirit level tool directly onto the top surface of the Base Plate.
To adjust the height and level of the base plate, rotate the feet individually.
Turning a foot counter-clockwise (anti-clockwise) changes its height profile, allowing you to perfectly raise or lower each corner.
Adjust until the spirit level indicates that the Base Plate is perfectly horizontal along both the X and Y axes.
Installing the Supportive Motor

Locate the designated motor cutout/hole in the base configuration.
Gently seat the Supportive Secondary Motor into its respective hole.
Route and neatly extend its output connection cable across the base structure so it can easily interface with the main motor housing later.
Mounting the Plinth Over the Suspension Springs

Double-check that your Base Plate remains absolutely level.
Lift the Turntable Plinth with extreme care.
Gently lower the plinth onto the base structure. Ensure that all the isolation springs protruding from the Base Plate align and seat cleanly into their corresponding receiving recesses underneath the plinth.
Motor Coupling & Final Seating

Retrieve the connection cable coming from the Supportive Motor; it should emerge cleanly near the cutout designated for the main motor. Firmly plug the connection wire of the Main Brain Motor into the connection wire of the Supportive Motor.

Align the coupled motor assembly with the plinth's dedicated chassis cutout and lower it into place. Do not let the motor housing forcefully strike the plinth; guide it down smoothly until it rests flush.
Platter and Spindle Knob Installation

Gently place the heavy Precision Platter onto the central bearing spindle assembly.

Re-verify the level of the turntable by placing the spirit level tool directly on top of the newly mounted platter. Make fine micro-adjustments via the adjustable feet if necessary.

Position the leveling instrument on the platter sequentially in the two orientations illustrated in the image. This ensures that the platter surface is completely flat and accurately leveled.

Take the Platter Spindle Knob and securely fit it onto its designated center position.
Installing the Drive Belts

Take a High-Elasticity Drive Belts provided in the package.

Carefully loop the drive belts around the perimeter of the Platter.

Guide the remaining ends of the belts over the dual pulleys of the motor drive system, making sure they sit cleanly inside the machined grooves without twisting.
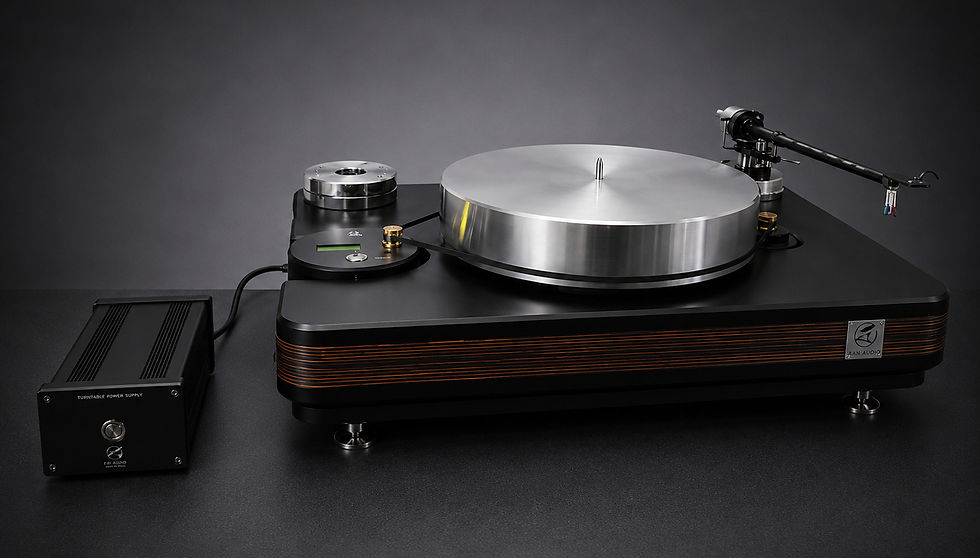
Power Connections

Place the isolated Premium Power Supply Box a short distance away from the turntable chassis. Keeping the power transformers separated from the high-sensitivity playback components minimizes any potential electromagnetic interference or induced hum.

Connect the Main AC Power Cable to the rear power inlet of the Power Supply Box.
Take the specialized 15V Aviation Interface Cable. Align the pins of the aviation plug with the output socket on the Power Supply Box and thread the locking collar securely.

Connect the remaining 15V Output plug of the aviation cable directly into the power input port located on the Main Brain Motor housing.
Toggle the main power switch on the Power Supply Box to the 'ON' position. Press the power/start button on the Main Brain Motor.
The integrated digital control display will immediately light up, initializing at a baseline factory speed setting of 33 RPM.
Speed Calibration
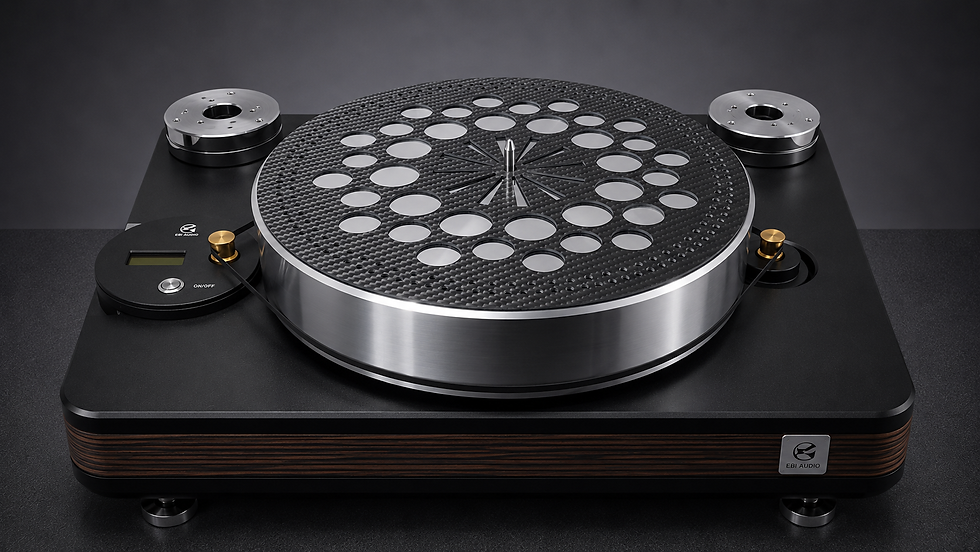
Place the provided Carbon Platter Mat flat over the platter.
With the motor running, verify the rotational accuracy under your room’s lighting system or with your mobile camera.
Fine-tune your motor pitch control until the markings on the measurement sheet appear perfectly stationary.

Note: Two types of Plates are provided with the unit: carbon and paper. You can use either or both to fine-tune and stabilize the rotational speed. Once the indicator points remain stationary at 33 RPM, press and hold the red calibration button located on the Brain Motor for approximately 5 seconds. When the display shows 33 RPM, it confirms that the speed calibration has been successfully completed.
Enjoying the Music
Once speed accuracy is flawlessly calibrated, complete your setup process:
Turn the turntable motor OFF.
Mount, balance, and align your chosen tonearm and phono cartridge as per their technical specifications.
Carefully place your favorite premium vinyl record onto the platter.
Turn the power back on, gently cue the tonearm down, and enjoy the pristine, ultra-dynamic, authentic analog sound of your EBI Audio Hansdhwani Turntable.

Comments